Configure security features
Required user role Technical
You can configure:
- Encryption keys (master, read-only and dynamic keys) used for secured communications between the payer and Tipalti environments
- IP Internet Protocol sources from where API calls are allowed to originate
API keys
You can generate and manage API keys for Tipalti APIs. A master key is available automatically for you once you begin using the Tipalti Solution.
- Go to Administration > API integration > API keys. Keys are masked by asterisks.
- To view a key, click
 beside the key. The decrypted key displays.
Master key
- To change the master key:
- Click Change key. A Change key dialog displays asking you to confirm your selection.
- Click Confirm. A new key (masked by asterisks) displays in the Master key field and the old key displays below it. The old key will remain active until it is revoked.
- To revoke the old key:
- Click Revoke old key. A Revoke old key dialog displays asking you to confirm your selection.
- Click Confirm. The old key is removed.
Read-only key
- To generate a read-only key:
- Beside Advanced options, click
 . Two options display.
 - In the Read-only key field, click Generate key. A Generate key dialog displays asking you to confirm your selection.
- Click Confirm. The read-only key (masked by asterisks) displays.
- Beside Advanced options, click
- To delete the read-only key:
- Click Delete key. A Delete Key dialog displays asking you to confirm your selection.
- Click Confirm. The read-only key is removed.
Dynamic key
When you first start using the Tipalti Solution, by default, the dynamic key functionality is turned off. To change the setting:
- Click
 . The field becomes editable.
 - Click
 and select Optional or Required. An Expiration field displays.
- Optional: Allows you to use either the dynamic key or master key to call the APIs.
- Required: You must use the master key to call the GetDynamicKey API function, which generates the dynamic key. Then use the dynamic key to call any of the other API functions.
- Click the check mark to confirm your selection.
- In the Expiration field, click . The field becomes editable.
- Type the desired number of minutes before the key expires.
- Click the check mark to confirm your selection.
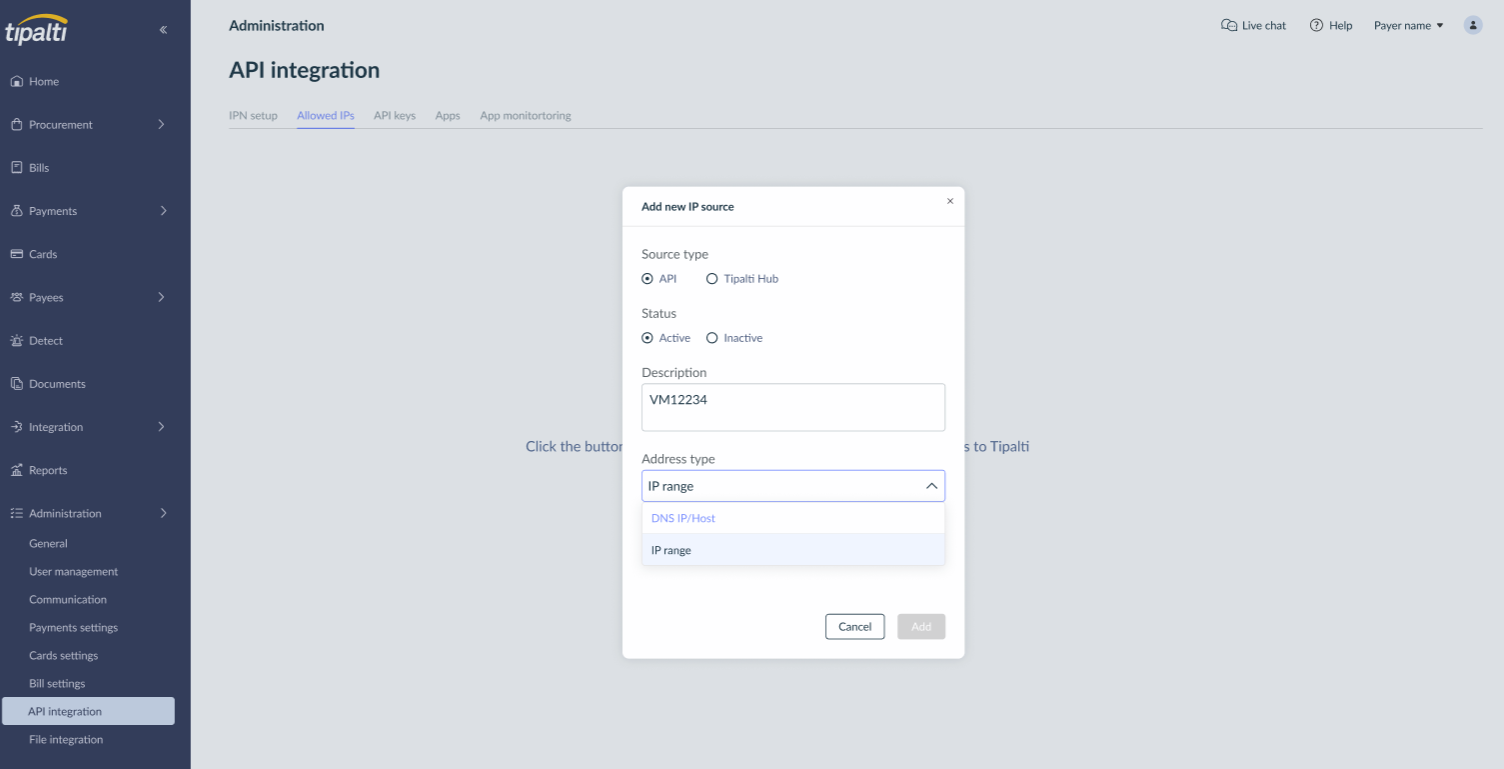
Allowed IPs
If you are using Tipalti's APIs, you need to specify IP sources that are allowed to make calls to Tipalti (a minimum of one source is required).
To define an IP source:
- Go to Administration > API integration > Allowed IPs.
- Click Add IP source.
- In the Source type field, select either API or Tipalti Hub.
-
In the Status field, select Active or Inactive.
- In the Description field, type a description of the traffic source.
-
In the Address type field, select IP range or DNS Domain Name System IP/Host.
- Do one of the following.
- In the DNS IP/Host field, type either the IP address or host name (e.g., 123.456.789.123 or www.abcdefg.com).
- In the IP min range and IP max range fields, type the minimum and maximum traffic ranges, respectively.
-
When you’re done, click Add to add the new entry.
To edit an IP source:
- Go to Administration > API integration > Allowed IPs.
- Find the relevant IP source.
- At the end of the row, click the 3-dot menu and select Edit.
- In the Edit IP source dialog, edit the relevant fields.
- Click Save to save your changes.
To delete an IP source:
- Go to Administration > API integration > Allowed IPs.
- Find the relevant IP source.
- At the end of the row, click the 3-dot menu and select Delete.
- In the Delete IP source? dialog, click Delete source.